Blog

Helm charts – quick start

In this post we will se the advantages that Helm gives to the team in terms of managing Kubernetes releases.

What is Helm? : As apt-get, yum, yarn, npm , brew and others package manager, Helm do the same but oriented to Kubernetes.

So how help me? Basically allow you to package your different yaml files in to a chart and helm create a history inside Kubernetes for that reason do an upgrade or a rollback is less complicate.

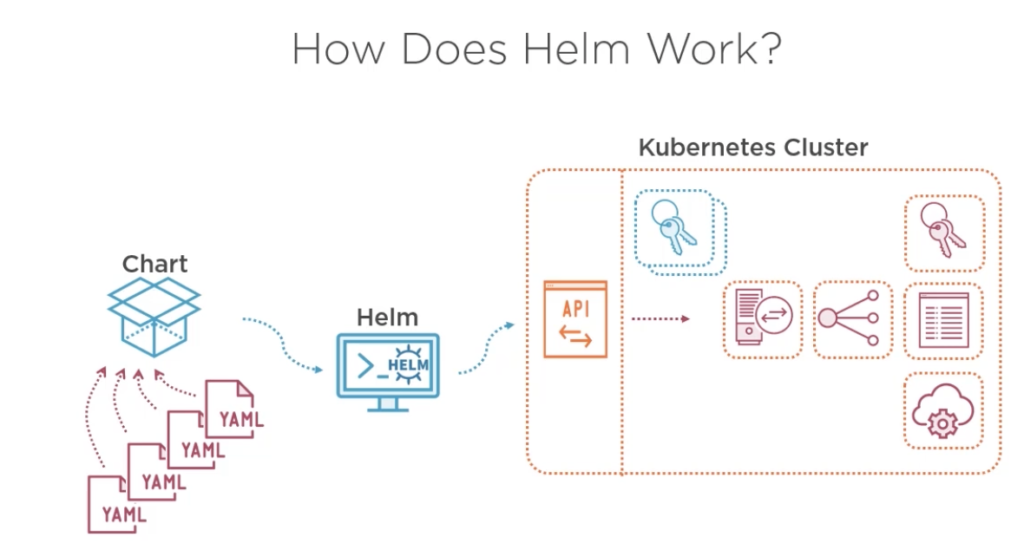
As the image above, helm packages all your yaml files and easily deploy your workloads besides helm maintain a list of all changes and releases and can merge changes out of helm charts yo keep the desired state, furthermore Helm allows you to create aa complex interpolation to create templates and be your workload more reusable. for example imagine that you have a complex deployment (Ingress, services, deployment replicas pods, with front end applications, backend and database workloads) then you could simply release a version of this just changing the name of your deployment like:

# this demo is using helm version v3.6.2+gee407bd
helm install dev myfisrtchart
helm install qa myfisrtchart
helm install prod myfisrtchart

In this demo we will make a simple helm chart.

to create a new helm char we are going to do:

  1. a simple hello world using nginx:alphine
  2. get the yaml files and create a service
  3. create the helm structure
  4. create a parameter to play with replicas
  5. install the helm
  6. upgrade helm
  7. and delete the helm deploy
# create a repo

mkdir -p mychart/templates
cd mychart 
# create the next file Chart.yaml and copy an paste these lines.

nano Chart.yaml

#--- paste
apiVersion: v2
name: mytestdeploy
appVersion: "1.0"
description: A Helm chart for xtian testing 1.0 
version: 0.1.0
type: application
#

Create the deployment yaml file

kubectl create deployment helm-httpd-frontend --replicas=3 --image=httpd:2.4-alpine --dry-run=client -o yaml > sample-templates/deployment.yaml

Folder structure most be like this:

Now is just mater to install our service with helm:

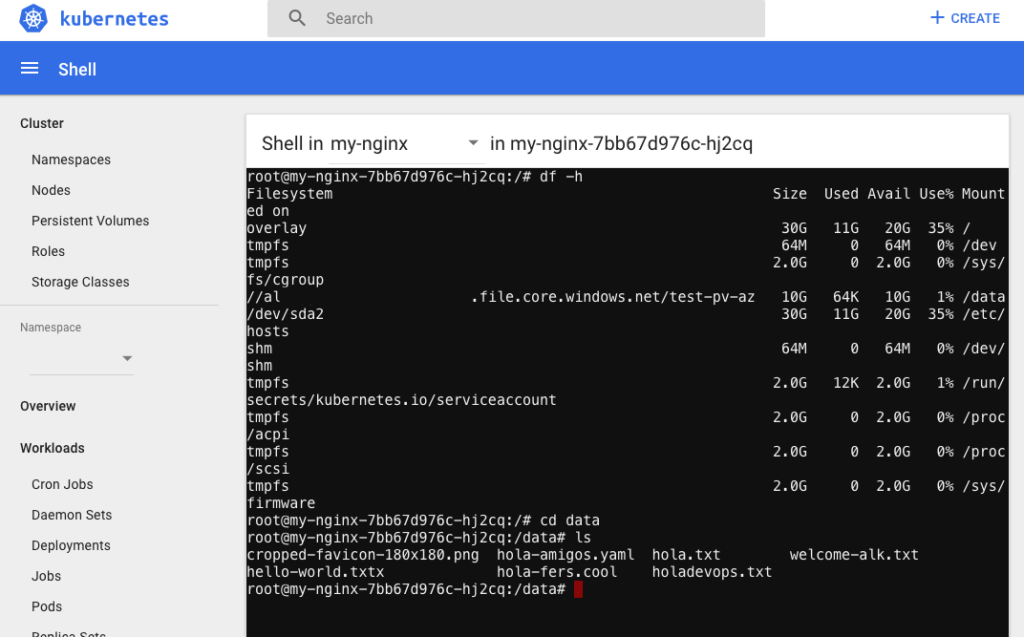
helm install myfirst-deploy mychart/ 

NAME: myfirst-deploy
LAST DEPLOYED: Tue Jul  6 12:24:11 2021
NAMESPACE: default
STATUS: deployed
REVISION: 1
TEST SUITE: None

#test it 
kubectl get deploy -n default 

Now we are going to add some vales to be replaces by a values file, this is not the only method to make your chart more dynamic, there ame other methods like env variables, .json schema even we can use some functions and pipes. To know more go to: https://helm.sh/docs/chart_template_guide/variables/

add a values.yaml with this

replicas:
  replicas_test: 2

# modify the sample-deployment in line 9
replicas: {{ .Values.replicas.replicas_test }}

$ helm upgrade myfirst-deploy mychart 
Release "myfirst-deploy" has been upgraded. Happy Helming!
NAME: myfirst-deploy
LAST DEPLOYED: Tue Jul  6 12:35:58 2021
NAMESPACE: default
STATUS: deployed
REVISION: 2
TEST SUITE: None

now we have an easy way to manage replicas with values in helm

to delete just do: helm uninstall myfirst-deploy

This was a simple poc with helm of course there are a lot of capabilities that can be added to your chats so hop this can be useful to you. The code for this labs is in: https://github.com/xRegner/helm-pininos

Best. xtian – Regner

Terraform+gcp-mig and load balancer

mig = Managed instance group

En está POC vamos a crea un managed instance group en azure, que es el equivalente a un auto scaling group o un scale-set dependiendo de la nube que estemos usando.

Un grupo de instancias es un conjunto de instancias de máquinas virtuales (VM) que puedes administrar como una sola entidad.

Compute Engine ofrece dos tipos de grupos de instancias de VM, administrados y no administrados, si quieres saber más puede ir a la guía oficial. https://cloud.google.com/compute/docs/instance-groups?hl=es-419

Empezaremos por crear una imagen base linux con Nginx, esto lo vamos a hacer con packer y Ansible. (proximo post)

Básicamente lo que vamos a obtener es una imagen con Nginx instalado y nuestra aplicación web.

Ya que tenemos nuestra imagen base.

POC Terraform + Bucket + BigQuery 💾

En este artículo veremos como crear un bucket en GCP con fuentes de datos que se van a utilizar para crear un flujo en con google BigQuery, todo utilizando terraform.

Para está POC se requiere una cuenta de Google Cloud, si no tienes una puedes crearla y te regalan 300 USD de crédito. https://cloud.google.com/

Esté tutorial puede llegar a generar un costo mínimo por lo cual se requiere tener especial cuidado en destruir los artefactos creados.

Ya con una cuenta en google es necesario tener un proyecto y una cuenta de servicio para que pueda ser usada por terraform. https://cloud.google.com/compute/docs/access/service-accounts?hl=es-419

Bien, por ahora no usaremos un backend bucket para guardar nuestro tf state pero bien se podría incluir.

Entonces la estructura de nuestro proyecto quedaría como se muestra en el diagrama:

  1. Crear un bucket y cargarle un archivo .csv
  2. Crear la definición de BigQuery
  3. Crear una tabla con los datos de nuestro archivo .csv
  4. Crear una vista basada en la tabla anterior con un filtro (SQL Query)
  5. Crear una vista con información de BigQuery public dataset https://cloud.google.com/bigquery/public-data

Nuestro proyecto de terraform lo puedes ver acá: https://github.com/xRegner/GCP-Terraform-Dataset

.
├── README.md
├── bucket-sample-gcp-xtian
│ ├── bucket.tf
│ ├── output.tf
│ └── variables.tf
└── datasets-sample-gcp-xtian
├── data
│ └── sheet-t.csv
├── main.tf
├── teradata-307123-aea8bdd5e41f.json
├── terraform.tfvars
└── variables.tf

Básicamente en una carpeta vamos a poner a manera de modulo la creación de nuestro bucket con el archivo .csv que se encuentra dentro de la carpeta datasets-sample-gcp-xtian > data > sheet-t.csv

Una vez que nuestro bucket fue creado y aprovisionado con el archivo vamos a sacar la ruta privada de ese csv para que nuestro dataset pueda ir a buscar la info, esto se puede ver el archivo output.tf

output "bucketurl" {
  value = google_storage_bucket.my_bucket_xtian_pro.url
}

output "file_name" {
  value = google_storage_bucket_object.topsecret_info.name
}

La carpeta datasets-sample-gcp-xtian contiene el main.tf que va a crear todos los componentes y se describe a continuación:

provider "google" {

  credentials = file("aquí debes poner la ruta de tu cuenta de servicio en .json ")
  project     = var.project_id
  region      = var.region
  zone        = var.zone
}

# Aquí importamos el módulo y le pasamos las variables del nombre de nuestro bucket

module "bucket_info" {
  source      = "../bucket-sample-gcp-xtian"
  bucket_name = var.bucket_name

}

# en esta sección definimos nuestro BigQuery

resource "google_bigquery_dataset" "bigqry_rhdw" {
  dataset_id                  = "teradatadts"
  friendly_name               = "test-dtaset"
  description                 = "Nuestro super dataset de tipo tabla"
  location                    = "US"
  default_table_expiration_ms = 3600000

  labels = {
    env = "default"
  }
}

# En esta sección estamos creando un schema vacío de datos y nuestra tabla se llama tabla1

resource "google_bigquery_table" "default" {
  dataset_id          = google_bigquery_dataset.bigqry_rhdw.dataset_id
  table_id            = "Tabla1"
  deletion_protection = false

  time_partitioning {
    type = "DAY"
  }

  labels = {
    env = "default"
  }

  schema = <<EOF
[
  {
    "name": "permalink",
    "type": "STRING",
    "mode": "NULLABLE",
    "description": "The Permalink"
  },
  {
    "name": "state",
    "type": "STRING",
    "mode": "NULLABLE",
    "description": "State where the head office is located"
  }
]
EOF

}

#Aquí creamos la tabla que se llena desde el archivo que depositamos en el bucket 

resource "google_bigquery_table" "sheet" {
  dataset_id          = google_bigquery_dataset.bigqry_fidw.dataset_id
  table_id            = "secret-data"
  deletion_protection = false

  schema = <<EOF
[
  {
    "name": "id",
    "type": "STRING",
    "mode": "NULLABLE",
    "description": "el id de los paises"
  },
  {
    "name": "Country",
    "type": "STRING",
    "mode": "NULLABLE",
    "description": "algunos paises de ejemplo"
  },
    {
    "name": "Quote",
    "type": "INTEGER",
    "mode": "NULLABLE",
    "description": "monto de venta"
  }
]
EOF


  external_data_configuration {
    autodetect    = true
    source_format = "CSV"

    source_uris = [
      "${module.bucket_info.bucketurl}/${module.bucket_info.file_name}",
    ]
  }
}


# Aquí creamos la view de la tabla anteriormente creada 

resource "google_bigquery_table" "public" {
  deletion_protection = false
  dataset_id          = google_bigquery_dataset.bigqry_rhdw.dataset_id
  table_id            = "view-pro"

  view {
    query          = "SELECT * FROM `teradata-307123.teradatadts.secret-data` WHERE Country = 'Mexico'"
    use_legacy_sql = false
  }

  depends_on = [
    google_bigquery_table.sheet,
  ]
}

# Finalmente creamos una vista a partir de los datos públicos que tiene google

resource "google_bigquery_table" "publicdataset" {
  deletion_protection = false
  dataset_id          = google_bigquery_dataset.bigqry_rhdw.dataset_id
  table_id            = "view-pro-public"

  view {
    query          = "SELECT EXTRACT(YEAR FROM creation_date) AS Year, EXTRACT(MONTH FROM creation_date) AS Month, COUNT(*) AS Number_of_Questions, ROUND(100 * SUM(IF (answer_count > 0, 1, 0)) / COUNT(*), 1) AS Percent_Questions_with_Answers FROM `bigquery-public-data.stackoverflow.posts_questions` GROUP BY Year, Month HAVING  Year > 2009 AND Year < 2016 ORDER BY Year"
    use_legacy_sql = false
  }

  depends_on = [
    google_bigquery_dataset.bigqry_fidw,
  ]
}


output "uris" {
  value = google_bigquery_table.sheet.external_data_configuration[0].source_uris
}


Los siguientes pasos son simplemente hacer:

#Dentro de la carpeta que contiene el archivo main:

terraform init
terraform plan
terraform apply -auto-approve

Y eso es todo.

Conclusión:

Con terraform podemos armar un flujo de datos inicial definiendo así un estado deseado de trabajo y a la vez construir una estructura que puede ser consumida por herramientas de visualización como Data studio, Tableau, Microstrategy etc, esta es una simple POC pero definitivamente puede ser la base de un proyecto complejo de aprovisionamiento de datos + infraestructura como código.

Espero te sirva esta información.
Christian Regner

Contenerización de un servicio java para hacer un file-upload 🌱 + 🐳 spring-boot y docker

La idea es realizar un proyecto con spring-boot para generar un servicio REST que nos ayude a subir imágenes a un folder que puede ser un volumen persistente.

spring

Esto se vuelve muy útil si tienes que subir algún archivo como una imagen a un volumen que sera común para varios pods o contenedores ya que se expondrán los endpoints para, subir, eliminar, visualizar y listar.

El code de este proyecto lo puedes encontrar acá: https://github.com/xRegner/api-upload-files-spring

git clone https://github.com/xRegner/api-upload-files-spring.git

Dedicaremos un espacio para explicar el código, por ahora nos vamos a centrar en crear el contenedor, ejecutarlo y probar su funcionamiento en postman.

FROM openjdk:8-jdk-alpine
RUN addgroup -S spring && adduser -S spring -G spring
RUN mkdir upload-dir
ARG JAR_FILE=./*.jar
COPY ${JAR_FILE} app.jar
CMD ["java","-jar","/app.jar"]

Básicamente estamos usando la imagen base de `openjdk:8-jdk-alpine` y vamos a crear un usuario y un grupo con el cual va a correr nuestro contenedor, vamos a crear dentro del contenedor una carpeta que usaremos para capear como volumen y finalmente vamos a pasar el .jar dentro para ejecutar nuestra app.

Una vez que se clona el repo, se debe ejecutar los siguiente.

cd thc-upload-files-java
mvn clean package 
cp Dockerfle target/
cd target 
docker build -t thc-upload-images-local .
docker run -ti -d  -p 8080:8080 --restart=always -v $(pwd)/upload:/upload-dir/ \ 
       --name local-files-thc thc-upload-images-local
 .   ____          _            __ _ _
 /\\ / ___'_ __ _ _(_)_ __  __ _ \ \ \ \
( ( )\___ | '_ | '_| | '_ \/ _` | \ \ \ \
 \\/  ___)| |_)| | | | | || (_| |  ) ) ) )
  '  |____| .__|_| |_|_| |_\__, | / / / /
 =========|_|==============|___/=/_/_/_/
 :: Spring Boot ::        (v2.3.4.RELEASE)

2021-02-26 17:52:49.115  INFO 3851 --- [           main] c.t.c.f.FileUploadApplicationTests       : Starting FileUploadApplicationTests on xtian.local with PID 3851 (started by xtian in /Users/xtian/tmp-api-upload-files/api-upload-files-spring)
2021-02-26 17:52:49.117  INFO 3851 --- [           main] c.t.c.f.FileUploadApplicationTests       : No active profile set, falling back to default profiles: default
2021-02-26 17:52:49.844  INFO 3851 --- [           main] o.s.s.concurrent.ThreadPoolTaskExecutor  : Initializing ExecutorService 'applicationTaskExecutor'
2021-02-26 17:52:50.020  INFO 3851 --- [           main] c.t.c.f.FileUploadApplicationTests       : Started FileUploadApplicationTests in 1.307 seconds (JVM running for 1.988)
[INFO] Tests run: 1, Failures: 0, Errors: 0, Skipped: 0, Time elapsed: 1.962 s - in com.techinc.common.fileupload.FileUploadApplicationTests
2021-02-26 17:52:50.348  INFO 3851 --- [extShutdownHook] o.s.s.concurrent.ThreadPoolTaskExecutor  : Shutting down ExecutorService 'applicationTaskExecutor'
[INFO]
[INFO] Results:
[INFO]
[INFO] Tests run: 1, Failures: 0, Errors: 0, Skipped: 0

Ahora que ya tenemos el .jar docker se encargará de crear la imagen en tu maquina y correr el contenedor y estaremos listos para exponerla por el puerto 8080.

ya que esta corriendo nuestro container podemos ir a postman y probar los siguientes endpoints:

Now you will be able to use postman to call: POST  http://localhost:8080/api/uploadFile/folder-imgs –> “folder-imgs” is a mandatory path variable, this endpoint sotore a file GET http://localhost:8080/api/getFiles –> Get all files GET http://localhost:8080/api/files/folder-imgs/sample.jpg –> display an stored image DELETE http://localhost:8080/api/deleteFile/uploadFile/sample.jpg –> delete a file

Nota “folder-imgs” puede ser remplazado por algún texto que haga referencia a las imágenes o archivos que se quieren subir.

Acá la colección de postman.

Espero te sirva.

Saludos 🤙🏼

Config maps from files (K8S)

Creando config maps desde archivos y poniéndolos como volumenes en tu servicio.

Esto es muy util ya que muchas veces tenemos en un contenedor con nuestra aplicación y al iniciar el contenedor necesitamos que ejecute un script.

por ejemplo en este post, creamos una imagen para nuestros servicios de node.js y ejecutamos un script por commando al crear el contenedor.

Imaginemos que este script necesita algunas instrucciones adicionales, ufff esto nos obligaría a crear nuevamente la imagen con estas nuevas instrucciones, pero qué pasaría si, en lugar de modificar la imagen base cada vez que necesitamos añadir instrucciones usamos un configmap en kubernetes que nos ayude a separar ese script en algo así como un volumen persistente y que no sea volátil cada que se crea el pot, por supuesto sería una muy buena opción.

Entonces vamos a partir de este docker file que como se muestra usa un script que pone a correr nuestro servicio en vue y es expuesto por nginx.

el code lo puedes encontrar acá https://github.com/xRegner/vue-base-image

# etapa de producción de nuestro contenedor
FROM nginx:1.13.12-alpine as production-stage
# this is a default version only if you are versioning your apps
ENV MYAPP_VERSION_VUE=1.2.3  
# you going to need this ca-certificates to allow alpine use wget to download a package from an external package manager 
RUN   apk update \
  &&   apk add ca-certificates wget \
  &&   update-ca-certificates  
RUN mkdir -p package/dist/
# we copy our script to be executed once the container runs
COPY script-vue.sh ./
#comment this line if you want to use a repo or package manager
COPY ./dist  ./package/dist/ 
EXPOSE 80
CMD [ "sh" , "script-vue.sh"]

Podemos observar en el docker file que se hace un COPY script-vue.sh ./ básicamente es el script que vamos a poner como configmap, una vez que ya tenemos creada nuestra imagen lista para ser orquestada en un k8s

Creamos un namespace donde van a vivir nuestros servicios:

kubectl create namespace configmapns
kubectl create configmap startup-script --from-file=script-vue.sh -n configmapns

Esto debe crear un configmap que se llama startup-script el cual contiene un archivo que se llama script-vue.sh, es importante que el nombre del archivo sea igual al que vamos a mapear dentro del contenedor.

En esta imagen de lado derecho podemos ver el configmap y como fue importado al k8s.

looks like:

apiVersion: v1
data:
  script-vue.sh: "#!/bin/bash\n# uncomment the lines bellow if you have your packages
    ready to be downloaded \n\n#if [ -d \"package/dist/\" ]\n#then\n#echo \"ya hay
    una version anterior, para actualizar es necesario actualizar el contenedor\"\n#else\necho
    $MYAPP_VERSION_VUE >> versioncontrol.txt\necho \"descargar\"  $MYAPP_VERSION_VUE\napk
    update; apk add ca-certificates wget; update-ca-certificates;\n#wget --no-check-certificate
    --auth-no-challenge   --user=user --password=yourpass https://my-private-repo/repository/my-samplevue/-/vue-project-vue-$MYAPP_VERSION_VUE.tgz
    \ -O - | tar -xz\ncp -r package/dist/. /usr/share/nginx/html\necho \"daemon off;\"
    >> /etc/nginx/nginx.conf\n#fi\nnginx"
kind: ConfigMap
metadata:
  creationTimestamp: "2021-01-13T14:16:21Z"
  name: startup-script
  namespace: configmapns
  resourceVersion: "47509644"
  selfLink: /api/v1/namespaces/configmapns/configmaps/startup-script
  uid: da0034d6-596f-4bd3-b126-370ed985dbce

donde en data: se ve el nombre del archivo que se va a mapear por el configmap y su contenido.

ya que tenemos el archivo solo basta agregarlo a nuestro servicio como si fuera un volumen.

Ejemplo:

Dentro de nuestro yaml file debemos poner algo así:

      volumeMounts:  
      - mountPath: /script-vue.sh
          name: startup
          subPath: script-vue.sh
      dnsPolicy: ClusterFirst
      imagePullSecrets:
      - name: acr-secret
      restartPolicy: Always
      schedulerName: default-scheduler
      securityContext: {}
      terminationGracePeriodSeconds: 30
      volumes:
      - configMap:
          defaultMode: 0777
          name: startup-script
        name: startup

En este caso 0777 es como nuestro chmod y nos ayuda a dar permisos sobre ese archivo usualmente ese valor va a cambiar por 511, el volumen se mapea por medio del nombre en este caso startup.

super con esto deberiamos poder modificar el script directamente en el config map y solo sera necesario reiniciar el pot para que tome el nuevo valor y listo.

Referencia de los permisos 0777, https://kubernetes.io/docs/concepts/configuration/secret/

Espero te sirva esta info.

Saludos cordiales
CB

Magento pros and cons

If you are thinking to implement your own e-commerce and Magento is in your option list, here you have some tips to choose wisely.

Magento is one of the big players in e-commerce or e-business platforms, it is open source and could support many business models, all due to the number of good things it offers, However, an assessment of your current necessities, available infrastructure, and budget is necessary first to make a decision.

Many companies believe that an open-source platform won’t have cost but this is a totally wrong idea, you need to think about a server to store your platform, a volume to put your data, a database engine, people, SEO, CDN, etc. but the most important Not allow people without technical knowledge make technical decisions in your production stack.

Cons ☠️

  1. It is expensive because you need infrastructure to support your project, there are many options including the Adobe cloud or create your own IaaS strategy, Docker, and why not with a compose or just a swarm mode nevertheless you have to consider that all this infra needs to be supported by a compute scenario, you need to evaluate if you want to have tons of online stores or it is just one, maybe could be better get a service online like Magento Cluster .com or a get a PaaS approach in your favorite flavored cloud.

Any of these options are good just bear in mind the complexity that could give to your IT team if you decide to create it from scratch.

2. Not the best documentation for issues or trouble shooting is available on internet.

A Magento’s platform could be a pain in the neck when is the wrong set up unfortunately many problems can only be fixed by developers or creating many workarounds. i.e.

A performance degradation that impacts directly to your database server due to INSERT INTO `search_tmp queries that never ends.

If you have this issue consider refactoring the search catalog code, if you are under an Nginx increase the connections allowed too.

You never going to fix it by increasing the CPU or the Ram memory even thou Tunning your database could help but it doesn’t resolve the problem

https://github.com/magento/magento2/issues/15545

3. Magento has many performance issues, so you need to check the documentation first, review your workflow strategy, if you go to Kubernetes think about volumes, Magento has a special way to store products so a simple NFS or a Fileshare strategy could be the best option, this difficult the idea of have replicas of your deployment so basically a node per store it is not an option and finally. don’t forget to think twice in have your database on Kubernetes.

Pros 🤩

  • Open source but there aren’t a lot of expert developers
  • It has many features that other platforms
  • Easy integration with payment platforms like PayPal
  • It is scalable up “more CPU, more ram” just be careful with a scale set strategy
  • Mobile Friendly
  • Large community

Hopefully, this encourages you to know more before to hire, implement, or develop a solution.


and remember Don’t let non-technical people make technical decisions and try to keep it simple stu…

Front VUE base-container

The purpose of this post is to give you an idea of how we could create our own custom images.

This is super useful because you could have only one image to display all your front applications instead of creating an image per application, taking a moment to think that your CI/CD pipelines going to be faster, and you avoid store images per each commit.

So the idea is to allow developers only to care for their code, in this example we going to use a Vue app.

  1. Create a VUE app // nothing complicated we going to use the VUE base template
  2. Create a docker file to serve that app
  3. Create a script to say where this container going to get the .dist package ” usually stored in a package manager”

1. create a vue app

As I mentioned before we going to use a vue base template so basically we going to create a new folder and then a star vue with the default configuration

Note: you need vue cli instaled

mkdir vue-project
cd vue-project
vue create newproject -d 
#-d is to say to vue "use only the default configuration"
you have to see something like this.

If we run our new app we goin to see something like this:

Good job we could assume that this is our cool app then we going to create a docker file and a simple bash script to command the next actions that the container has to follow.

2. Create the dockerfile

Here I’m going to use the visual studio code but you could use any IDE so I’m going to type: code .

I’ve created a Docker file on the root.

# etapa de producción de nuestro contenedor
FROM nginx:1.13.12-alpine as production-stage
# this is a default version only if you are versioning your apps
ENV MYAPP_VERSION_VUE=1.2.3  
# you going to need this ca-certificates to allow alpine use wget to download a package from an external package manager 
RUN   apk update \
  &&   apk add ca-certificates wget \
  &&   update-ca-certificates  
# we copy our script to be executd it once the container runs
COPY script-vue.sh ./
EXPOSE 80
CMD [ "sh" , "script-vue.sh"]

3. Create the Script

I’ve created a script-vue.sh file:

#!/bin/bash

if [ -d "package/dist/" ]
then
echo "ya hay una version anterior, para actualizar es necesario actualizar el contenedor"
else
echo $MYAPP_VERSION_VUE >> versioncontrol.txt
echo "descargar"  $MYAPP_VERSION_VUE
apk update; apk add ca-certificates wget; update-ca-certificates;
wget --no-check-certificate --auth-no-challenge   --user=user --password=yourpass https://my-private-repo/repository/my-samplevue/-/vue-project-vue-$MYAPP_VERSION_VUE.tgz  -O - | tar -xz
cp -r package/dist/. /usr/share/nginx/html
echo "daemon off;" >> /etc/nginx/nginx.conf
fi
nginx

We assume that we are getting at least one version from a private repo if there is a dist folder in that path we asume that we have to download a new version then untar the folder a finally star nginx.

Versioning

Check that we are using an environment variable so you could type docker run with this env variable to indicate which version the container has to use.

Then it just matters to docker build our image and run it, now I’m going to modify a little bit the script and docker the docker file for our demo.

Back in to our demo:

we need to generate the /dist folder and build our image so, go ahead:

#to compile our code and generate an artifact 
npm run build 

Once we have builded our app we are ready to run:

docker build -t mybaseimage . 
docker run -ti -d -p 80:80   mybaseimage:latest 
#or passing an env 
docker run -ti -d -p 80:80 -e MYAPP_VERSION_VUE=1.5.6  mybaseimage:latest 

Now you have a generic image just to command it the version you want to be downloaded.

…you can clone the code here.

https://github.com/xRegner/vue-base-image.git

Happy code mate…

Docker Swarm init

¿Qué es? Docker swarm es un modo de operación que proporciona el motor de docker.

¿para qué sirve? Sirve para manejar y / o administrar clusters de docker.

referencia: https://docs.docker.com/engine/swarm/

¿Cómo lo ponemos en marcha?

  • Tener tres o más virtual machines, estas pueden estar en la nube o bien puedes tener en virtual box tres o más instancias creadas con docker-machine o vagrant o simplemente tres o más imagenes con docker instalado.

Este comando nos va ayudara a iniciar el swarm y a registra uno de los nodos como maestro y permitirá que los workers puedan trabajar en red y se escuchen entre ellos.

#login by ssh en el nodo 1 ó maestro 
docker swarm init --advertise-addr 10.0.2.15

El resultado debe ser algo como esto:


To add a worker to this swarm, run the following command:

    docker swarm join --token SWMTKN-1-4p6g402botq1cu4qfr0x9403m2cm42dyq6yr986ygy8cm4oki0-3t687p55ptrqq8kpbm8l43662 10.0.2.15:2377

To add a manager to this swarm, run 'docker swarm join-token manager' and follow the instructions.

Ahora vamos a entrar a los workers o nodos y copiamos y pegamos el comando de arriba.

#dentro del nodo maestro, 10.0.2.15
docker node ls

Deberíamos ver una lista con nuestros nodos pertenecientes al swarm.

Ahora podemos crear servicios que se deployaran en los nodos workers o principal ejemplo:

#dentro del master o manager 
docker service rm docker service create --replicas 1 --name helloworld alpine ping 192.168.0.1

Simplemente creamos un contenedor que este haciendo ping para que no termine y que se llame helloworld. ==> entonces el master decidirá donde deployarlo.

esto lo podemos comprobar con docker service ls

docker service ps # => nos muestra donde se encuentran nuestros servicios corriendo
### escalando el servicio###
docker service ls # => para obtener el id del contenedor 
docker service scale <idcontainer>
# Lista de comandos de docker service
Commands:
  create      Create a new service
  inspect     Display detailed information on one or more services
  logs        Fetch the logs of a service or task
  ls          List services
  ps          List the tasks of one or more services
  rm          Remove one or more services
  rollback    Revert changes to a service's configuration
  scale       Scale one or multiple replicated services
  update      Update a service
docker service ps helloworld # 

Podemos actualizar las versiones de nuestro servicios si que se nos caiga el servicio.

docker service update

En este otro ejemplo hacemos un nodeport y donde este puerto se abrirá para todos los workers, es decir que a pesar de que mi contenedor esta expuesto por el puerto 80 cualquier nodo va a responder por el puerto 8080

docker service create \ 
  --name test-web \
  --publish published=8080,target80 \
  --replicas 2 \
  -- nginx

De esta forma es como docker swarm trabaja, sin tanta complejidad como kubernetes, claro sin menos features pero es una buena opción para servicios como blogs y algunos stacks de desarrollo.

saludos a todos.

Kubernetes cluster desde cero CentOS 7 parte 1

En este post vamos a crear un cluster de kubernetes utilizando virtua machines de tipo spot o pre empty, estas maquinas son recursos que las nubes como aws, azure, google y otras proveen por una fracción del costo mensual, es decir que son más baratas.

Es importante mencionar que su tiempo de operación no esta garantizado quiere decir que la maquina puede ser apagada o borrada cuando alguien más reclame su uso, eso depende del proveedor.

Para nuestro caso de uso, estas maquinas son opción ya que podemos tener maquinas para crear ambientes muy baratos y que realmente se paguen por uso, si llevamos el tema a IaC podríamos incluso crear y destruir maquinas on demand.

Este post esta dedicado a la creación de un cluster desde cero con un master y dos nodos y ahorro de costos, evidentemente la ventaja de tener un cluster administrado por un proveedor no tiene comparación pues te evita muchos dolores de cabeza.

Creando el nodo master.

Creamos una VM Centos 7, en este caso usamos azure y una vez dentro de la maquina nos aseguramos de cambiarle el nombre.

sudo su -
hostnamectl set-hostname master

Instalando Docker

yes | sudo yum install -y yum-utils
sudo yum-config-manager \
    --add-repo \
    https://download.docker.com/linux/centos/docker-ce.repo

sudo yum-config-manager --enable docker-ce-nightly
sudo yum install docker-ce docker-ce-cli containerd.io -y 

sudo systemctl enable docker
sudo systemctl start docker

Preparando el nodo master

sudo setenforce 0
sudo sed -i 's/^SELINUX=enforcing$/SELINUX=permissive/' /etc/selinux/config
sudo sed -i '/swap/d' /etc/fstab
sudo swapoff -a
cat <<EOF > /etc/yum.repos.d/kubernetes.repo
[kubernetes]
name=Kubernetes
baseurl=https://packages.cloud.google.com/yum/repos/kubernetes-el7-x86_64
enabled=1
gpgcheck=1
repo_gpgcheck=1
gpgkey=https://packages.cloud.google.com/yum/doc/yum-key.gpg https://packages.cloud.google.com/yum/doc/rpm-package-key.gpg
EOF

Instalando Kubernetes

sudo yum install -y kubelet kubeadm kubectl --disableexcludes=kubernetes
sudo systemctl enable kubelet
sudo systemctl start kubelet

sudo yes | kubeadm init --pod-network-cidr=10.244.0.0/16
mkdir -p $HOME/.kube
sudo cp -i /etc/kubernetes/admin.conf $HOME/.kube/config
sudo chown $(id -u):$(id -g) $HOME/.kube/config
export ARCH=amd64
curl -sSL "https://github.com/coreos/flannel/blob/master/Documentation/kube-flannel.yml?raw=true"  | sed "s/amd64/${ARCH}/g" | kubectl create -f -
kubectl apply -f https://raw.githubusercontent.com/coreos/flannel/master/Documentation/kube-flannel.yml

Find the code here.

https://gitlab.com/uxidevsolutions/scripts/-/tree/master/scripts

Azure Storage Account + Kubernetes for Persistent Volumes

Previously we saw how to create an NFS Server and mount it in a Kubernetes cluster to have PV (Persistent volumes) this is super useful because allows you to keep your data in separate storage… but what happens when you need to have a lot of persistent volumes. An NFS server could turn into madness. 💀

This is because you have to modify the etc/fstab file to be sure that that volume will be mounted once you restart or deallocates your server.

To get more details you could go to this post: http://www.regner.com.mx/nfs-network-file-system-storage-for-persistent-volume-claim-part-2/

As people say in my country, a lo que te truje chencha…

This time we will mount an a Volume using an azure storage account in Kubernetes.

Necessary requirements :

  • A Kubernetes cluster
  • An Azure storage account
  • A file share

So, first of all, we going to create a new Service Account. usually, a storage account is created when you create a virtual machine, so, its enough with a standard LRS plan. less than 0.06 USD per GB 😎

Once we have our Storage account we are able to create a File share where we could mount a pv.

Basically we will need the name of your storage account, its principal key connection and the name of your file share. you could get that info in Access Keys link or typing in az az storage account keys list --resource-group test_rg --account-name global_test --query "[0].value" -o tsv

az storage account keys list --resource-group your_resorce_group_name --account-name your_storage_accout_name --query "[0].value" -o tsv

We need to create a Kubernetes secret to store the az storage account credentials so we need to apply a simple YAML file with this info.

kubectl apply -f secret.yaml

apiVersion: v1 
kind: Secret
metadata:   
  name: azure-secret   
  namespace: deafult
type: Opaque 
stringData:   
  azurestorageaccountname: storageaccountname 
  azurestorageaccountkey: TRDdT21e3FdeebecwenenGYUOHlg==

Cool, now we have a secret we could refer to this azure-secret in our PV.

Now we going to create a simple Nginx service with a volume mounted in our az storage account.

Here is the YAML file

apiVersion: v1
kind: PersistentVolume
metadata:
  labels:
    usage: fileshare-pv
  name: fileshare-pv
spec:
  accessModes:
    - ReadWriteMany
  azureFile:
    readOnly: false
    secretName: azure-secret
    shareName: test-pv-az
  capacity:
    storage: 10Gi
  persistentVolumeReclaimPolicy: Retain

---
kind: PersistentVolumeClaim
apiVersion: v1
metadata:
  name: fileshare-pvc
  namespace: default
  annotations:
    volume.beta.kubernetes.io/storage-class: ""
spec:
  accessModes:
    - ReadWriteMany
  volumeName: fileshare-pv
  resources:
    requests:
      storage: 10Gi

If you analyze this first we create a PV then we claim that PV, and we use the secret to refer our storage account.

ok to deploy our Nginx it is enough to apply this:

apiVersion: v1
kind: Service
metadata:
  name: my-nginx
  namespace: default
  labels:
    run: my-nginx
spec:
  ports:
  - port: 9080
    targetPort: 80
    name: http
  selector:
    run: my-nginx

---
apiVersion: apps/v1
kind: Deployment
metadata:
 name: my-nginx
 namespace: default
spec:
  selector:
    matchLabels:
      run: my-nginx
  replicas: 2
  template:
    metadata:
      labels:
        run: my-nginx
    spec:
      containers:
       - image: nginx
         name: my-nginx
         ports:
         - containerPort: 80
         volumeMounts:
           - name: azure
             mountPath: /data
      volumes:
        - name: azure
          persistentVolumeClaim:
            claimName: fileshare-pvc

kubectl apply -f nginx-test.yaml

if you get access to the node like kubectl exec or using the dashboard you could check the df -h to see your volumes

to test this you could type: touch hello-world.txt and you will be able to see in your file share storage a file hello-world.

Hope this will be useful to keep your data in a safe place. of course, if you are using an AKS or GKS or any Kubernetes on the cloud you could forget all this masochist process. 💆🏼‍♂