Previously we saw how to create an NFS Server and mount it in a Kubernetes cluster to have PV (Persistent volumes) this is super useful because allows you to keep your data in separate storage… but what happens when you need to have a lot of persistent volumes. An NFS server could turn into madness. 💀
This is because you have to modify the etc/fstab file to be sure that that volume will be mounted once you restart or deallocates your server.
To get more details you could go to this post: http://www.regner.com.mx/nfs-network-file-system-storage-for-persistent-volume-claim-part-2/
As people say in my country, a lo que te truje chencha…
This time we will mount an a Volume using an azure storage account in Kubernetes.
Necessary requirements :
- A Kubernetes cluster
- An Azure storage account
- A file share

So, first of all, we going to create a new Service Account. usually, a storage account is created when you create a virtual machine, so, its enough with a standard LRS plan. less than 0.06 USD per GB 😎

Once we have our Storage account we are able to create a File share where we could mount a pv.

Basically we will need the name of your storage account, its principal key connection and the name of your file share. you could get that info in Access Keys link or typing in az az storage account keys list --resource-group test_rg --account-name global_test --query "[0].value" -o tsv
az storage account keys list --resource-group your_resorce_group_name --account-name your_storage_accout_name --query "[0].value" -o tsv
We need to create a Kubernetes secret to store the az storage account credentials so we need to apply a simple YAML file with this info.
kubectl apply -f secret.yaml
apiVersion: v1
kind: Secret
metadata:
  name: azure-secret
  namespace: deafult
type: Opaque
stringData:
  azurestorageaccountname: storageaccountname
  azurestorageaccountkey: TRDdT21e3FdeebecwenenGYUOHlg==
Cool, now we have a secret we could refer to this azure-secret in our PV.
Now we going to create a simple Nginx service with a volume mounted in our az storage account.
Here is the YAML file
apiVersion: v1
kind: PersistentVolume
metadata:
  labels:
    usage: fileshare-pv
  name: fileshare-pv
spec:
  accessModes:
    - ReadWriteMany
  azureFile:
    readOnly: false
    secretName: azure-secret
    shareName: test-pv-az
  capacity:
    storage: 10Gi
  persistentVolumeReclaimPolicy: Retain

---
kind: PersistentVolumeClaim
apiVersion: v1
metadata:
  name: fileshare-pvc
  namespace: default
  annotations:
    volume.beta.kubernetes.io/storage-class: ""
spec:
  accessModes:
    - ReadWriteMany
  volumeName: fileshare-pv
  resources:
    requests:
      storage: 10Gi
If you analyze this first we create a PV then we claim that PV, and we use the secret to refer our storage account.
ok to deploy our Nginx it is enough to apply this:
apiVersion: v1
kind: Service
metadata:
  name: my-nginx
  namespace: default
  labels:
    run: my-nginx
spec:
  ports:
  - port: 9080
    targetPort: 80
    name: http
  selector:
    run: my-nginx

---
apiVersion: apps/v1
kind: Deployment
metadata:
 name: my-nginx
 namespace: default
spec:
  selector:
    matchLabels:
      run: my-nginx
  replicas: 2
  template:
    metadata:
      labels:
        run: my-nginx
    spec:
      containers:
       - image: nginx
         name: my-nginx
         ports:
         - containerPort: 80
         volumeMounts:
           - name: azure
             mountPath: /data
      volumes:
        - name: azure
          persistentVolumeClaim:
            claimName: fileshare-pvc
kubectl apply -f nginx-test.yaml
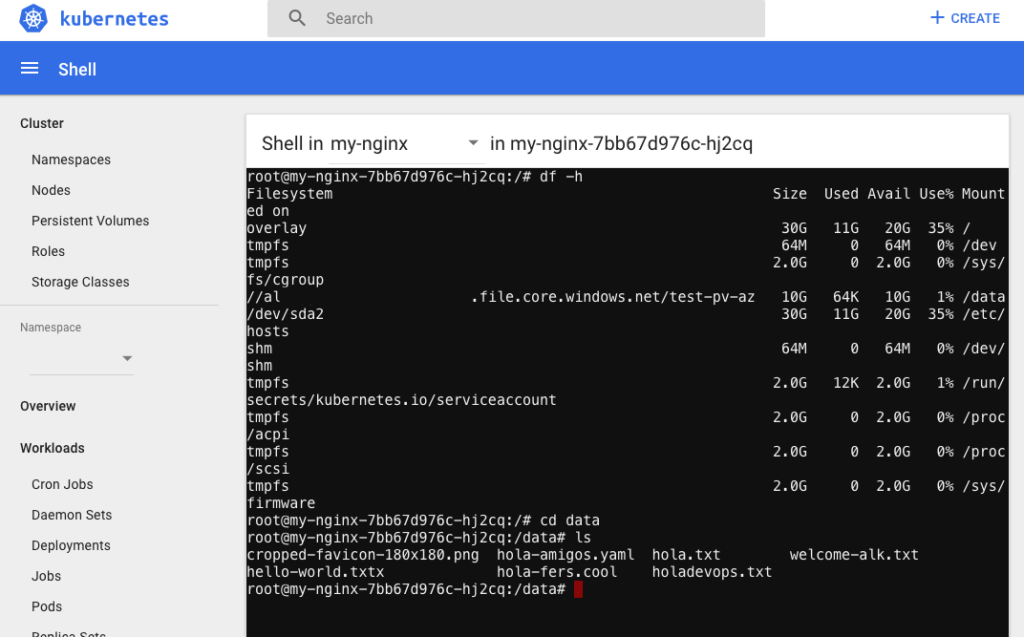
if you get access to the node like kubectl exec or using the dashboard you could check the df -h to see your volumes
to test this you could type: touch hello-world.txt and you will be able to see in your file share storage a file hello-world.
Hope this will be useful to keep your data in a safe place. of course, if you are using an AKS or GKS or any Kubernetes on the cloud you could forget all this masochist process. 💆🏼♂